How To Create Dropdown Menus In Yahoo SiteBuilder
Yahoo SiteBuilder is a very popular tool, which allows you to quickly create an entire website without any knowledge of HTML. It includes hundreds of customizable templates for business and hobby uses. With just a few clicks, you can insert photos, create new buttons, add wallpapers, draw tables, create forms and much more. Unfortunately, SiteBuilder has no such useful component for website navigation, as a dropdown menu.
In this short post, I will describe how to add a professional dropdown menu to your website created with Yahoo SiteBuilder. Knowledge of HTML, CSS or JavaScript is not required.
Step #1: Creating Your Menu
To create the menu, we will use the online tool - Dropdown Menu Generator. The main advantage of the Menu Generator is that it does everything automatically, quickly, easily and gives out the professional menu which does not require additional customization. For more details about the Menu Generator, please read the post: Unusual menu editor - Dropdown Menu Generator.
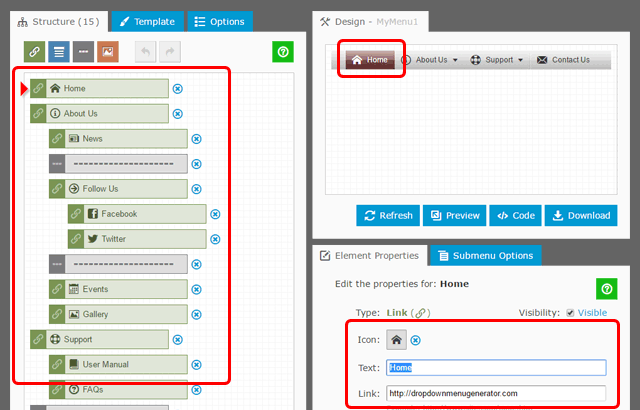
- Setting the structure
Under the Structure Tab, define menu elements: Links, Headers, Separators and Images. The Structure Editor is based on drag-and-drop functionality. It enables you to easily create a menu structure displaying multiple levels of hierarchy. For each Link Element, set the Text and the Link (URL) of the page.
To make your menu more user-friendly, add the icons. Menu Generator includes general icons (Home, Help, E-mail, etc.), icons for social networking (Facebook, Twitter, etc.), multi-purpose icons (arrows, dots, etc.) and others.
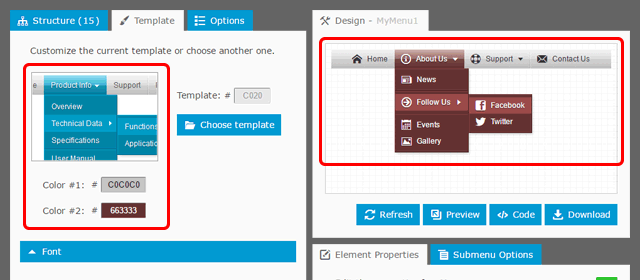
- Setting the appearance of the menu
In the Menu Generator, choose a suitable template for your menu, adjust the colors and the font in accordance with the style of your website.
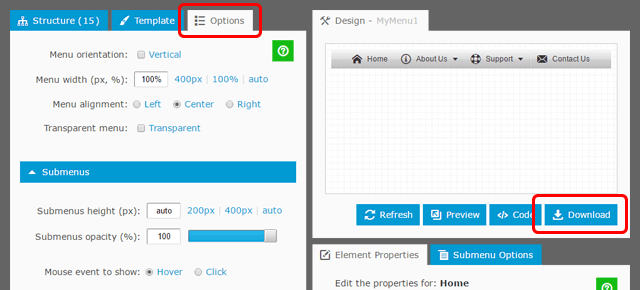
- Setting additional options and downloading
Under the Additional Options Tab, set the width to 100% and center alignment. Now your menu is completed; save it to the local disk as "MyMenu1.zip" file by clicking on the Download button. By default, the "MyMenu1" is a name of the menu.
Step #2: Adding the Menu to your website in Yahoo SiteBuilder
- Adding the menu to your site
Let's assume that your website is in the "C:\MySite" folder. To add the menu to your website, take the "MyMenu1.zip" file and extract the "MyMenu1" folder into the "C:\MySite" directory. The final path for menu's folder should be: "C:\MySite\MyMenu1". The "MyMenu1" folder includes the main JavaScript file "MyMenu1.js" as well as a few accompanying files.
Launch Yahoo SiteBuilder, open your website from the "C:\MySite" and ensure that the "MyMenu1" folder is a part of your site. If you do not see the "MyMenu1" folder in the "Site Contents" window, please right click on the blank area, and choose "Refresh File List".
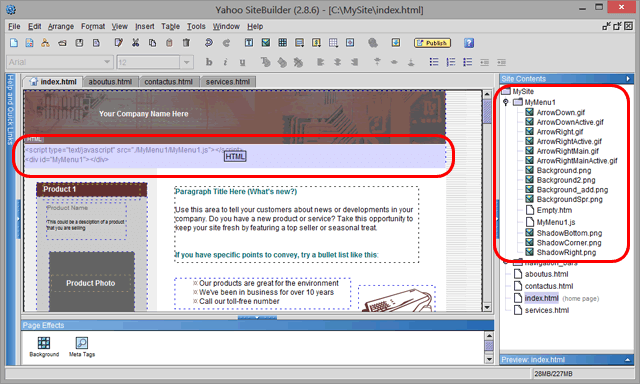
- Placing the menu on the page
In Yahoo SiteBuilder, choose from the menu: Insert -> Code Elements -> HTML. Copy and paste the code below into the "HTML Code" dialog.
<script type="text/javascript" src="./MyMenu1/MyMenu1.js"></script>
<div id="MyMenu1"></div>
Next, click the "OK" button; a blue box will be added to the page. This box is your menu. Finally, drag the box to where you want the menu to display, and set the width of the box equal to the width of your site (to show the menu without scroll bars).
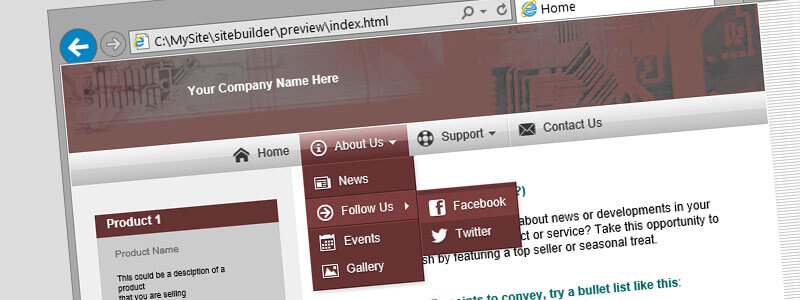
That's All! Now you can preview the page in your browser to see the dropdown menu on your page [*].
[*] In some cases the Firefox browser does not show icons in local preview mode. It is because the Firefox comes with a very strict "file uri origin" policy and blocks icon files referenced by "file:///".
To work around the problem, go to "about:config" and set to "false" the following preference:
security.fileuri.strict_origin_policy
- Additional notes
When publishing the website to your production web server, you need to upload the contents of the "MyMenu1" folder manually.
Please take also into account that a single menu instance can be used for multiple pages of your site. Since a menu is a single folder (the "MyMenu1" in our tutorial), it is enough to replace (re-upload) the current folder with a new one to see an updated menu immediately on every page. It is very convenient because you do not need to edit the code on multiple pages.
The basic characteristics of the menu created in Menu Generator
- Cross-Browser Support (IE 7.0+, Firefox 0.8+, Chrome 6.0+, Safari 1.2+, Opera 7.5+, etc.)
- Multiple levels of hierarchy
- Horizontal or vertical orientation
- Multilingual support
- Nice-looking transition effect
- Real PNG shadows
- Semi-transparency
- Support for tooltips
- Submenus are displayed over Flash movies and HTML select boxes
- The code is dramatically small
- No third-party libraries (like jQuery)
- Multiple menus on a single page are allowed
Conclusion
I hope this short post will help any website owner to create a professional multi-level dropdown menu for his site. Please do not hesitate to ask questions, we love responding!
Links